Welcome to episode #2 of Colour Coded Commentary. In this article, you can read about a recent Barrow match between Stephen Welch and Orlando Perri, with guest commentary from IM Gary Lane (sort of).
In this episode, Orlando’s comments are in Green, mine (with a bit of help from the computer) are in Black and Red indicates where I have ‘borrowed’ from Gary Lane’s book in my chess library.
If you have a game you would like featured in Colour Coded Commentary, please get in touch. We need notes or comments from both players and then will add a 3rd party review.
Meanwhile, the next Grand Prix round is on May 21. If you would like to play, please let Stephen know.
Stephen Welch – Orlando Perri
Battersea Barrow Cup 2019
16 April 2019
1 d4 d5
2 Bf4 e6
I played a recent game where I went straight to Bg5 so and move 5 shows maybe I should have done that in this game as well. So I will try that opening for a while and see what happens.
3 Nf3 Nf6
4 e3 Bd6
5 Bg5 O-O
6 Bd3 c6
My plan here is to expand my position on the queen side, I think I should have gone for 6 …c5, c6 is quite passive and blocks my white square bishop if I decide to do Bb7.
On the other hand, putting the pawn on c6 is a perfectly reasonable position, along the lines of a Semi-Slav defence. The problem, as Orlando discovered, is working out how to free the entombed c8 Bishop.
7 Nbd2 Nbd7
8 O-O b6?
I continue with my plan on the queen side but because of 6 … c6 now it’s too slow and I will soon get into trouble.
9 c3 c5
10 Re1 c4

This is a bit wrong, I’m closing the position and now Stephen’s e4 is soon becoming dangerous, I should have kept the tension and probably play 10 … Bb7.
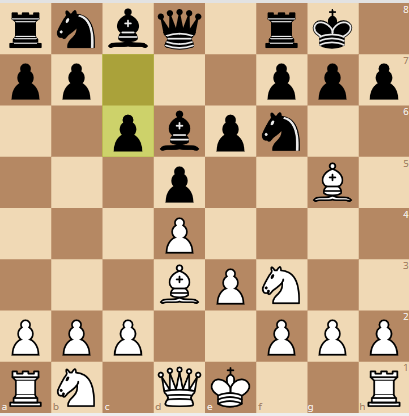
I also read once that this was a wrong move but it is hard to refute it … or at least I haven’t found a way. Here’s maybe an explanation from Gary Lane’s notes on Tseitlin-Liesmann, Kleve 1999 (“Ideas in Modern Chess Openings, p14), starting from a similar position (see diagram).
“8 … b6. Black chooses to employ a queenside fianchetto in order to help mobilise his queenside forces. On the other hand, 8 … c4?! is a typical mistake in such positions. Black has hopes of closing the centre and launching a queenside pawn storm after 9 Bb1 b5. But then comes 10 e4! (the right reaction – by advancing the e-pawn White can either open up the game for his pieces or push the pawn forward one more square to kick away the key defensive Knight.”
So that’s why; although it must be pointed out that in the game position, Stockfish is quite happy with 10 … c4.
11 Bc2 Rb8?
I think Orlando played a bit inaccurately here. Probably I would have played 11 … Qc7.
12 e4

Stephen is now is claiming space in the centre, I have 2 options, dxe4 or move the bishop to e7, I chose the former but I’m not sure it was the right choice.
If I was black, I would have played 12 de as well. The possibility of 13 e5 is too much to allow.
12 … dxe
13 Nxe4 Be7
14 Nxf6+ Nxf6
15 Ne5 Qd5
Most of my moves now are forced, I have few options to defend properly.
After the game, we agreed that this was the almost only move but in fact Stockfish suggests 15 … Bb7. And then, if 16 Nxc4 Qd5! with a triple threat of 17 … Qxg2#, … Qxc4, … Qxg5.
16 Bxf6?!
The computer calls this a mistake and prefers 16 Re3. But I played it to tee up the next move.
16 … Bxf6
17 Be4 Qb5
18 Nc6
After the game, we agreed that this was maybe not the best move but Stockfish is happy. A solid alternative is 18 Qc2.
18 … Rb7
19 Qc2
Threatening 20 Bxh7+ and protecting the pawn on b2. Although the threat of an exposed attack on the Rook looks strong, it actually isn’t.
19 … g6

20 Nb4
My idea was to play a4, attacking the Queen. Black has a potential defence by moving to b3 (eg 20 Ne5 Rc7 21 a4 Qb3) so by moving the Knight to b4 I cut off that line of defence. Stockfish, on the other hand, tells us that an immediate 20 a4 is better because 20 … Qb3 white should not take the Queen but rather move it (eg to b1) then a possible line is 21 … Bd7 22 Nxe5 Bxe5 23 de Bxa4 24 Bxb7. The problem is if 23 Rc7 (or some other move to get out of the way), 24 Ra3! traps the Black Queen. Neither of us saw this in the game, but – for future reference – this is the type of set up where a Queen can get easily trapped.
20 … Rc7
20 … a5 21 a4 Qg5 22 Nc6
21 a4 Qd7
22 d5!

If 22 … ed 23 Nxd4. If 22 … e5 Nc6, creating a wonderful outpost. Instead …
22 … Re8
23 Rad1 Qd6
24 g3?
I was worried about potential back rank issues (see below) but this is really a bad move. Even Kf1 would have been better. We discussed after the game that the right move is 24 de Qxe6 25 Bd3 (25 Bd5 Qxe1+ 26 Rxe1 Rxe1#).
24 … a5
25 dxe Qxe6
26 Nd5 Rd7
27 Qb1 Red8
This was a big mistake, I didn’t consider Bf5.
Unfortunately, neither did I. I saw the exposed attack on the Queen but failed to see that skewering Queen and Rook was more powerful than taking the pawn. The move I played turns out to be the losing move.

28 Bxg6??
After the game, we discussed 28 Bf5 Qc6 29 Nxf6+, but it turns out that 28 … Qxe1+ 29 Rxe1 Rxd5 is better.
There is also 28 Bf5 Qxf5.
Yes but this falls to 29 Qxf5 gf 30 Nxf6+, followed by Nxd7.
28 … Rxd5
29 Bxh7+ Kg7
30 Rc1 Re5
I want to exchange material now…
Although on paper I am a piece vs two pawns down, the computer gives and evaluation of -7. My position rapidly declines.
31 Rxe5 Qxe5
32 Re1 Qh5
33 Be4 Rh8
34 h4 Bxh4
I calculated a few variations for my sacrifice here, I wasn’t 100% sure of it but it looked good.
35 gh Qg4?
Qg4+ is not great, much better was 35 … Qxh5.
Indeed, the computer tells us 31 Kf1=.
36 Bg2 Bb7
37 Re4 Bxe4
38 Qxe4 Qxe4
39 Bxe4 Rxh4
40 f3 Kf6
41 Kf2 Rh2+
42 Ke3 Rxb2
43 Kd4 b5
44 axb
I didn’t notice during the game here but I could have simply pushed the a pawn to promotion from here.
44 … Rxb5
45 Kxc4 Rb8
46 Bc6? Rc8
47 Kb5 Rxc6
0-1.