Welcome to the first episode of “Colour Coded Commentary”. This will be an occasional series of notes based on Grand Prix Games.
The concept is that each player gives their views on the game, and then a third party reviews it and adds their thoughts. By combining the views and perspectives in one file, we get a deeper understanding of the amateur’s mind (to borrow from IM Silman).
Today we have a game from the Barrow Cup, with colour coded commentary by: Tom Butterworth (playing White), David Blackwell and Stephen Welch (with help from Stockfish 10+).
1 d4 d5
2 c4 c6
3 Nc3 Nf6
In this situation, I would personally have played 3 … Bf5 or 3 … Bg4 to avoid it getting stuck behind the pawn chain.
4 Bg5 Nbd7
5 Nf3 e6
6 cd cd
7 e3 Be7
8 Bd3 a6
This move seems unnecessary to me, although Stockfish doesn’t seem too upset.
9 Qc2 b5
10 a3 Bb7
Black as found a (slightly) better square for his bishop but I am not a big fan of his pawn structure.
11 Rc1 Rc8

- Qb1
This can’t be right, surely? I mean, yes, it does get the Queen out of the way of the c8 rook, and de-risks a potential move like 12 … b4 13 ab Bxb4. And it does keep the Queen on the b1-h7 diagonal, with a potential long-term idea of Bxf6, followed by Bxh7 but this seems a long way away. I personally prefer 12 Qb3.
12 … O-O
I was a little too defensive early on which allowed white to attack with little consequence; though white was thwarted and some parity gained in the middle game.
13 Ne5

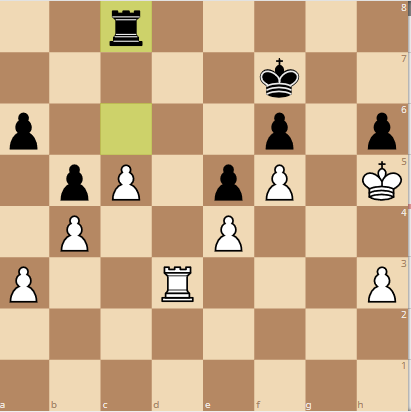
The idea in mind was 13 … Nxe5 14 de, where the knight on f6 is forced away from the defence of h7. Much too obvious for the likes of David! However, 12 … Nxe5 13 de Ng4 14 Bf4 (14 Bxe7 Qxe7 15 Bxh7+ Kh8 15 Bd3 Qh4 and Black is making all kinds of threats such as Nxe4 or d4, followed by Bxg2) 14 … Bh4 15 0-0 (mini diagram).
Stockfish then suggests the remarkable 15 … g5 which forces the Bishop to be taken on g3, eliminating the defence of e5. But I wouldn’t have seen this. Or even if I had I would not have played it as I would have been too worried about my exposed King.
13 … h6
14 Bxf6
Whilst this exchange conceded the bishop-pair, the alternative Bf4 invited Nh5 where doubled-pawns would have been a likely result. If 14 Bf4 Nh5, I think White can avoid doubled pawns with 15 Bxe7 Qxe7 16 Nxd7 Qxd7. And of course, White can also play an immediate 14 Nxd7, ignoring the threat on the bishop. Yes, but 14 Bh4 does allow 14 … Nxe5 forcing doubled pawns on the e-file.
14 … Nxf6
14 … Bxf6 is also possible forcing the Knight away from its strong position, either via a retreat or 15 Nxd7.
15 O-O Bd6
16 Nf3 Qc7?

A slight error from David – lining up his queen with my rook on the open c-file. In hindsight, this may have been so, but at the time my dark square bishop and Queen attacking white’s Kingside was an attractive set-up setup; along with my light squared bishop threatening to exchange the defending f3 knight. Also, I was looking to utilise the open B-file. However, white easily stopped me swapping the knight and my bishop-queen combo couldn’t really become dangerous. In retrospect, this was an error and gave white the initiative as I lost control of the open c-file. Personally, I’m normally a big fan of a Qc2-Bd3 (or Qc7-Bd6) battery against a castled-king. In this case, though, I’m inclined to agree with Tom. The Rook on c1 makes it too dangerous. Black has any number of decent, but unspectacular moves here. Were it me, I’d probably play 16 … Re8 or 16 … Bc6.
17 Nxd5
17 Nxb5 was also possible and would have allowed me to eliminate David’s dangerous-looking dark-squared bishop. In hindsight, this may have been the better choice, but Nxd5 led to the weakening of his kingside pawn-structure and gained a central pawn. My instincts would have been 17 Nxb5, followed by 17 … Qd7 (or similar) 18 Nxd6 Qxd6 19 Ne5.
17 … Qb8
18 Nxf6+ gf
19 Be4
Putting a stop to any Bxf3 ideas threatening Bxh2.
19 … Bxe4
20 Qxe4

20 … Kh8?
I think in this position, I would have played 20 … f5 kicking the Queen away, or maybe a Rook trade. Black’s move seems unnecessary. Indeed, Stockfish doesn’t like it at all.
21. Qh4
The correct response.
21 … Kg7
22 Rfd1
I tried hard to find a way to plant my knight near his king, but Nd2-f1-g3-h5 wasn’t the swiftest! What’s wrong with 22 d5 ed 23 Nd4, then Nf5?
22 … Rc7
23 Nd2
Stockfish likes 23 d5 here. Given White is a pawn up and has a safer King, I think I probably would have played 23 Rxc7.
23 … Rfc8
23 … f5
24 Rxc7 Qxc7
David’s domination of the c-file was a theme for much of the game and something I struggled to contest.
25 Ne4 Be7

26 Qg4+ Kh7
27 Qe2
27 Qh5 is also good, with a potential 27 … Kg7 28 b4, followed by 29 Nc5, depending on what Black does.
27 … Qb7
If I was going to attack the Knight, I’d probably play 27 … Qc6 instead. The computer, however, finds something even better: 27 … Qc2 28 Qxc2 Rxc2 29 b4 Ra2, eventually capturing those pawns. White’s weak back rank poses further complications.
28 Qd3 Kg7
29 b4
Preparing a solid outpost for the knight with the intention of blockading the c-file – Black’s key asset at this point.
29 … Qd5
30 h3 Qc4
31 Nc5

Getting this move in lowered my heart rate!
31 … Qxd3
32 Rxd3 Bxc5
This exchange seemed to favour White; handing an open file to the d3 rook and creating a solid passed pawn on c5. These two consequences were ultimately enough to see out the game. On that basis, then, we need to find a better move for Black. Possibilities include saving the a-pawn via 32 … a5 or 32 … Ra8. I also quite like 32 … f5 with the idea of 33 Nxa6 Rc1+ 34 Kh2, followed by 34 … Rc2 or 34 … Bd6+.
33 dc Rc6
34 Kh2 f5
35 f4
35 Rd6 and if … Rxd6 36 cd looks promising. The pawn can’t promote (yet) but it does tie up the Black King and allows White to advance his King and gain some space and start dealing with the pawns.
35 … Kf6
36 g4 Kg6
37 Kg3 f6
38 Kf3
38 Rd6 Rxd6 39 cd Kf7 40 gf.
38 … e5
39 gf+ Kxf5
40 e4+ Ke6
Although instinct suggests keeping the K in the centre, after 41 f5+, the King is easily forced away and White dominates.
41 f5+ Ke7
42 Kg4 Kf7
43 Kh5 Rc8
Very sneaky: a rushed 44 Kxh6 would result in 44 … Rh8#. Alternatively, if Black can control the g-file then Black has a few chances to trap the White King. But this requires White to ‘play ball’, which of course he refuses to do.
44. Rd7+! Ke8
45 Rd6?
I would have done all I could to keep the Rook on the 7th rank, via 45 Ra7, Rg7, or Rh7. White gets away with this slip because his position is so strong. By playing Ra7, Rg7 or Rh7, I would have handed Black the d-file. By keeping the rook on the 6th rank I could mop up his pawns and always return to d6 to block off the d-file. If my rook had been on the 7th rank, I couldn’t have returned to d7 since it’s not protected. My thinking was that if I could keep control of the open file, my position was completely dominating. That may be true but (for example) 45 Ra7 Rd8 46 Kg6, and while it is true that Black has the d-file, I believe it is of little consequence.
45 … Kf7
46 Rxa6 Rg8
47 Ra7+ Kf8
Stockfish claims (probably correctly) that Mate is inevitable now. We will leave it to readers to find the moves.
48 Ra8+ Kg7
49 Rxg8+ Kxg8
50 Kxh6
Black resigned.